An Army of One Prompt
On discovering that good process survives the jump from code to plastic.
Three days. Evenings only. Not particularly stressed about it.
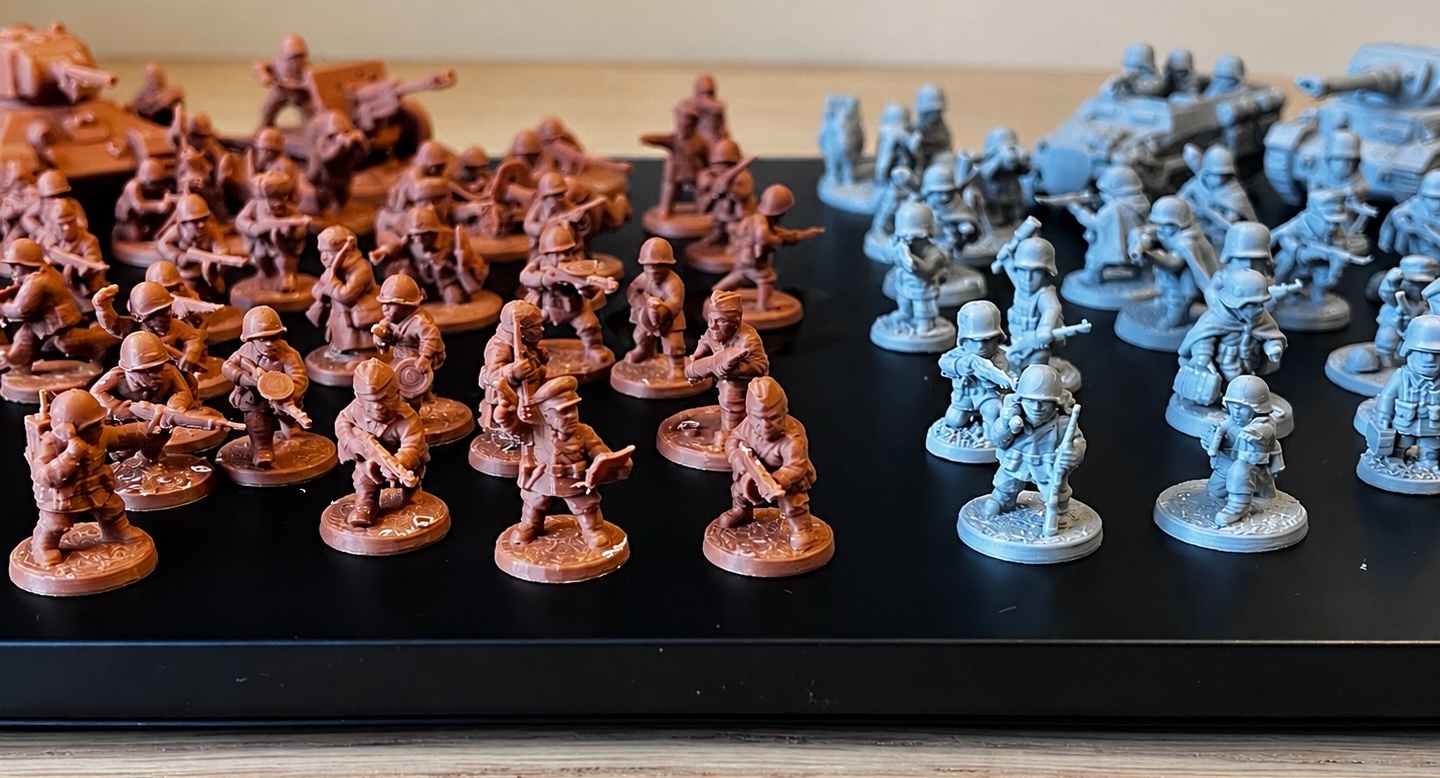
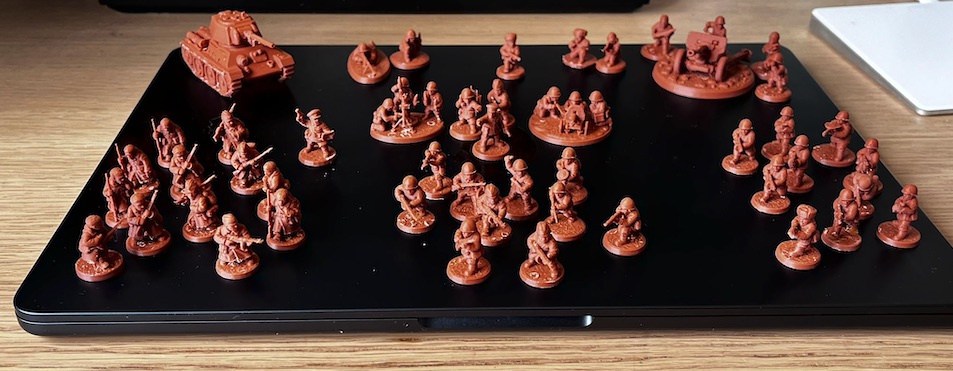
That is how long it took to go from nothing to a printed 1000 point Soviet army for Bolt Action. Roughly fifty models, around forty of them unique sculpts, fully designed, generated, modelled, sliced, printed, and sitting on my desk. Concept to physical thing in my hand, three evenings, in my spare time, while doing everything else I usually do.
That is … insane. I want to write this down because I think it is genuinely insane and I want to figure out on the page how it happened, because the how is the part I find more interesting than the what.
A quick recap, for anyone arriving cold
A couple of weeks ago I wrote about vibe coding a model into my house. That was the moment when a chain of generative tools produced a 3D printed World War II infantryman on my desk and quietly broke my brain. That post was about the astonishment. This one is about what happened when I stopped being astonished and started actually trying to build something at scale.
The original plan was two armies at 500 points each for Bolt Action v3. Thanks to wildly over achieving and the madness that only comes with AI enhanced momentum … the plan became somewhat more. Germans and Soviets, a thousand points each, scaled down to centimetres so they fit on a kitchen table instead of a garage floor. The toolchain was simple. ChatGPT for concept images, Meshy to turn front and back images into 3D models, Bambu Studio to prepare them for printing, and a Bambu printer to make them real. The Germans came first. The Germans were an education …
The German army taught me everything by being slightly wrong
I built the Germans the way I imagine most people would on first contact with this stack. Find a reference image, drop it into Gemini, ask for a soldier in that style, take the result, drop it into Meshy, get a model, slice it, print it. Repeat for every unit.
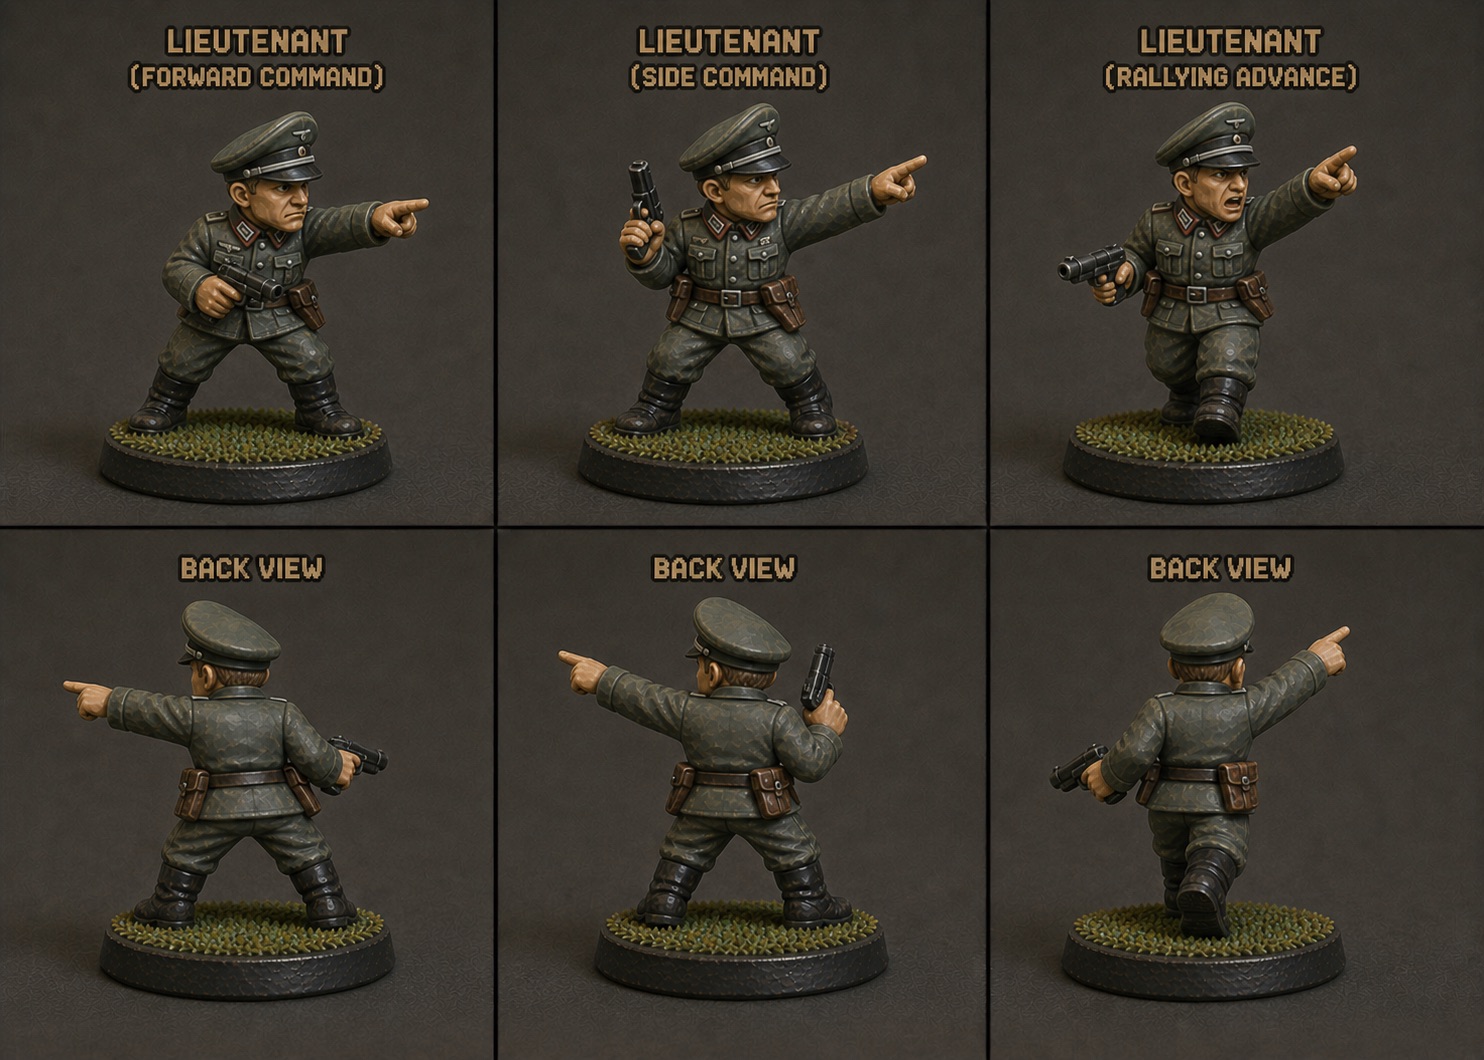
The starting reference image was a Fimo clay figure I had found from a random guy on Facebook. Cute, chubby, slightly weird proportions. I liked it. I started by feeding that image to Gemini and going “more of these, but Germans.” Somewhere along the way I started telling it I wanted that mixed with Metal Slug. The chunky comic-game vibe, oversized weapons, exaggerated everything. That was the visual register I was reaching for.
It mostly worked. The models came out. They were even, broadly, recognisable as German infantry. But every one of them was slightly off in a different way. The proportions drifted between models. The base treatment changed. One had a helmet that read as a beret. Another had a rifle thinner than the soldier’s wrist, which would have snapped off the print bed if I had even looked at it sideways. It was a constant fight with the LLMs to get anything consistent.
What I was doing, every single time, was asking the model to invent the style and the pose simultaneously, in the same prompt, with no shared context between sessions. Of course the army drifted. I was running fifty independent experiments and then complaining that they did not match.
So each model I made, I added another constraint to the prompt. Mistake on a model, add a constraint. Mistake on the next model, add a constraint. No thin protrusions. Round integrated base. Chibi proportions. Single solid silhouette. The prompt got longer. The models got slightly more consistent. I was slowly, painfully, by hand, reverse-engineering a brief and not realising that was what I was doing.
Somewhere around the lieutenant or the sniper, the penny dropped.
Separate the style from the pose
The mistake was treating each prompt as “make me a model.” What I actually wanted was to separate two things that I had been asking the model to do at the same time, and to do them in a specific order. Style is the thing that has to be consistent across the whole army. Pose is the thing that needs to vary per unit. Conflating those is how you get visual chaos.
But the order of operations matters even more than that, and this is the bit that took me the longest to figure out.
The Soviet workflow goes like this.
Start a fresh chat. Drop in the prompt. Not an image. Just the prompt. The whole brief. The unit description, all the style constraints, the silhouette rules, the front-and-back-must-match rules, and at the bottom: suggest three variations for poses only.
What that does is get ChatGPT to think. The chat reads through the brief and writes back three pose ideas in words. Gunner prone with the rifle braced, loader pointing toward the target. Or both kneeling behind cover. Or one standing scanning, the other reloading. Whatever the unit calls for.
This step is not about getting poses I want to use. It is about seeding the chat’s context with the right frame of mind. By the time it has written out three pose options, it has already worked through the brief on its own terms. It is now thinking inside the constraints I gave it, instead of about to be asked to obey them.
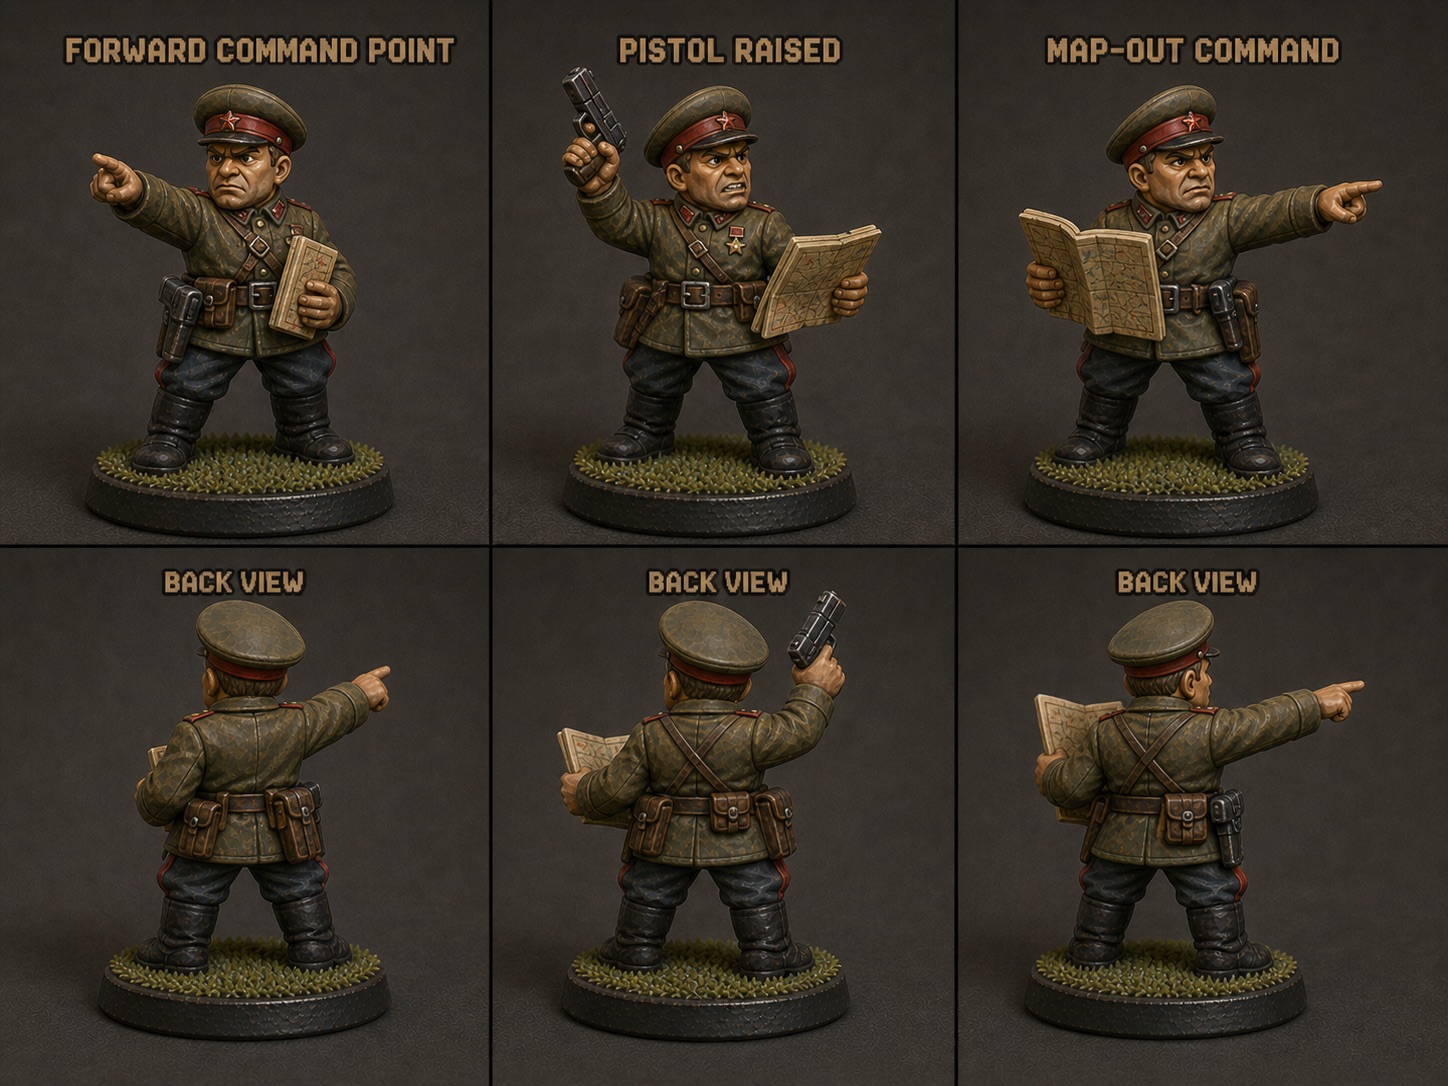
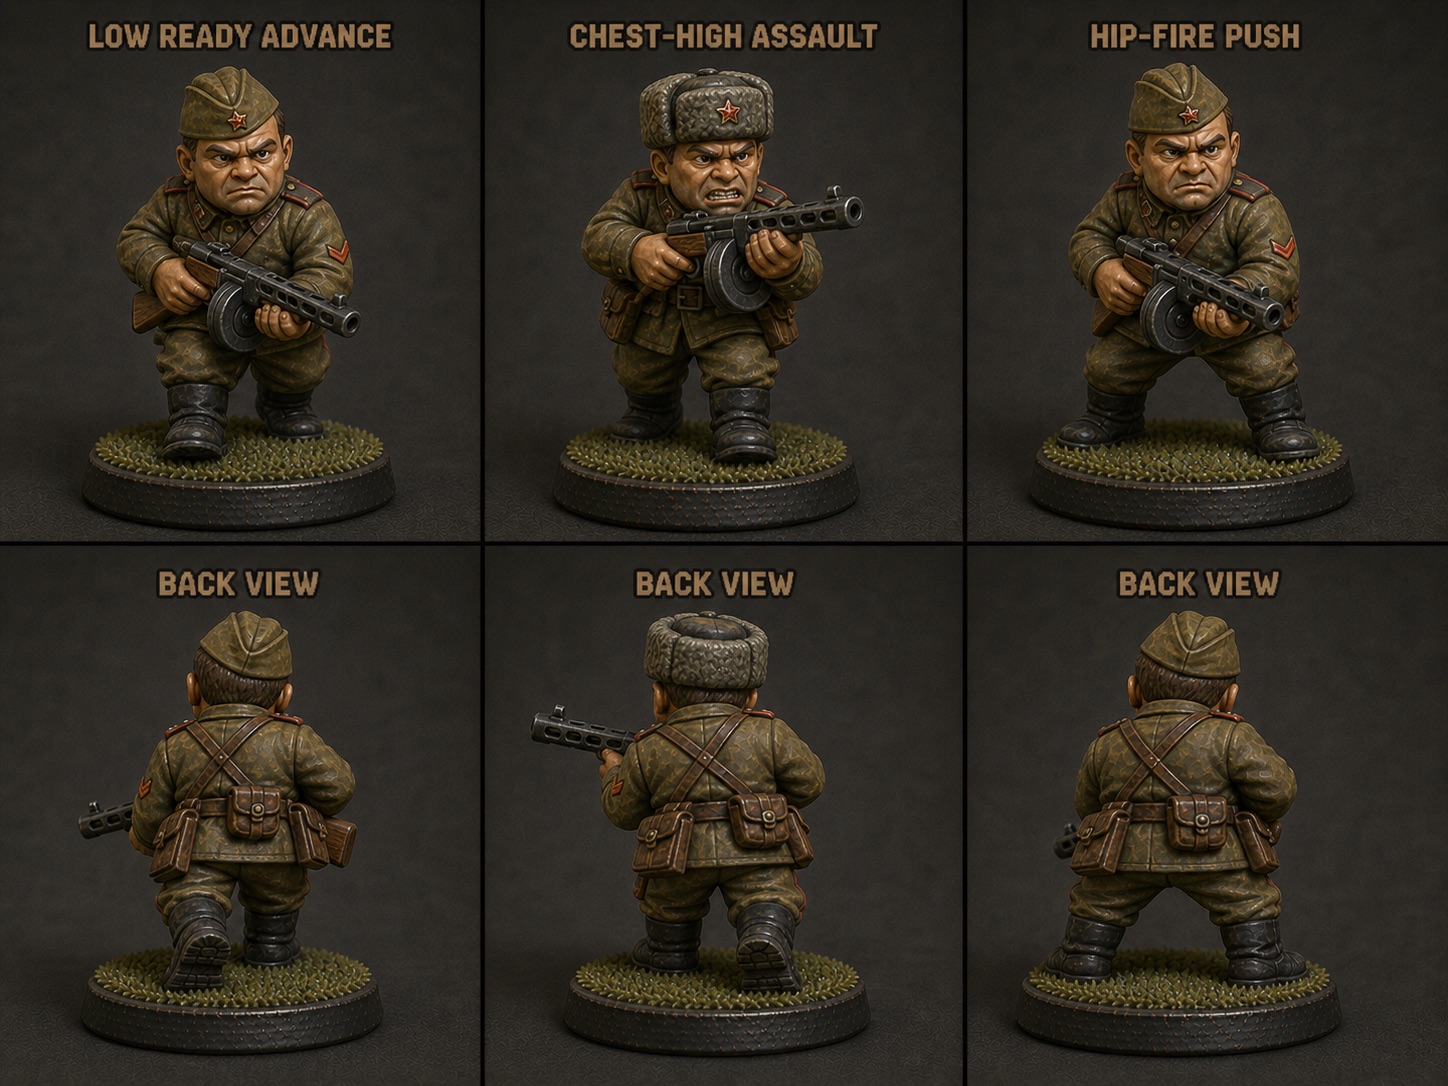
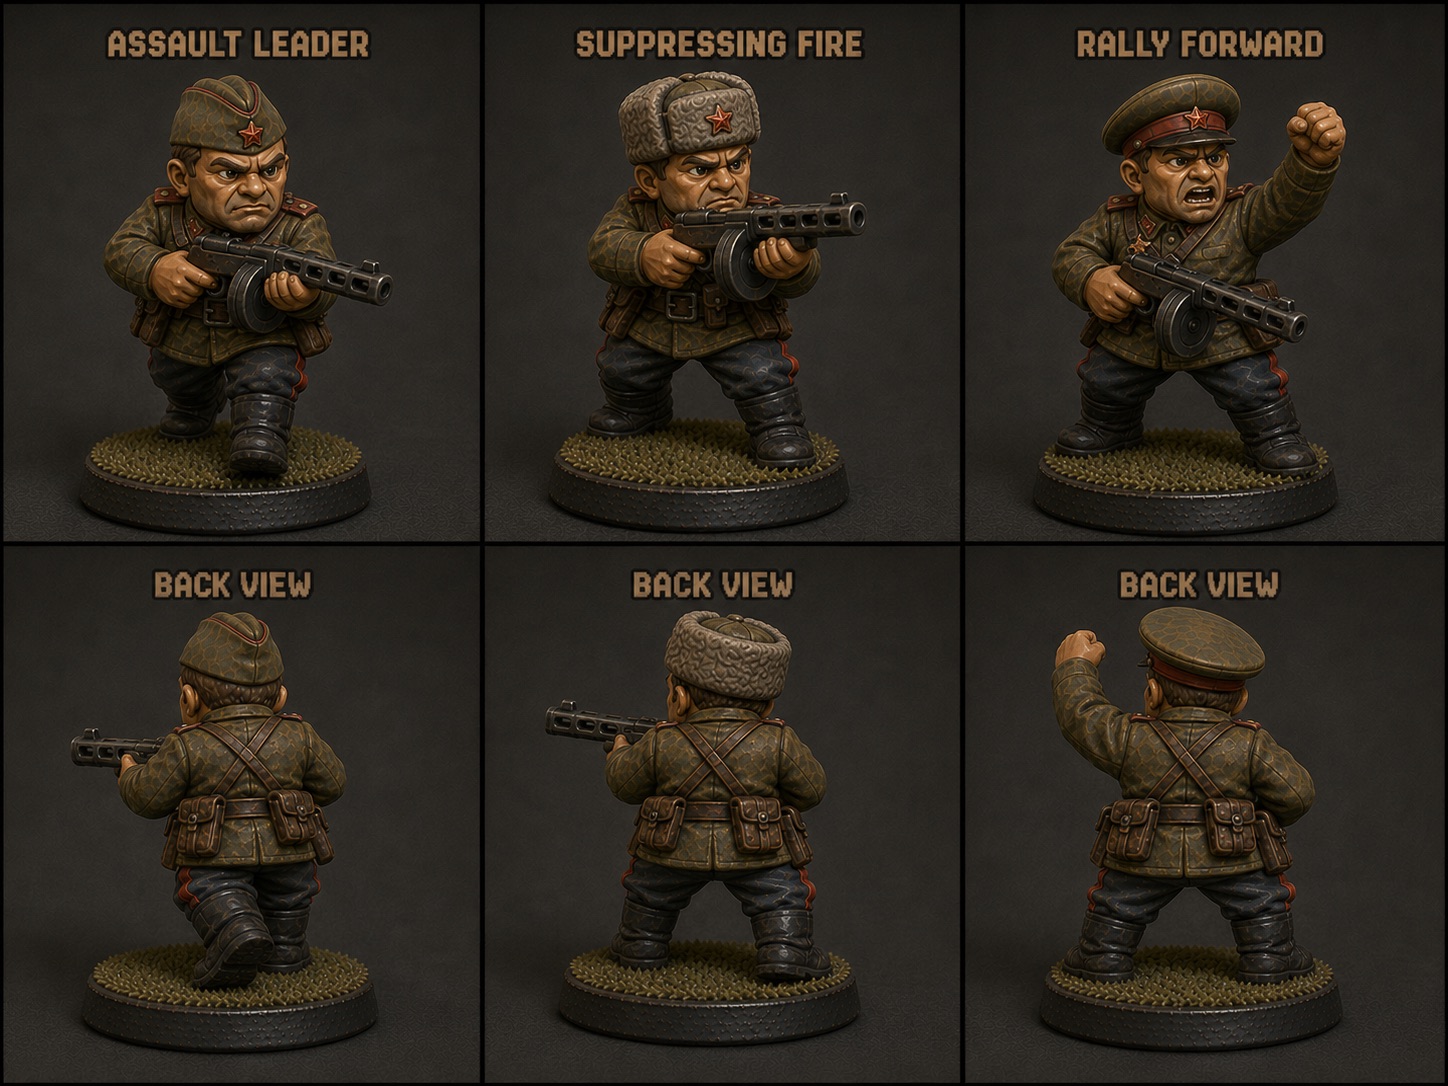
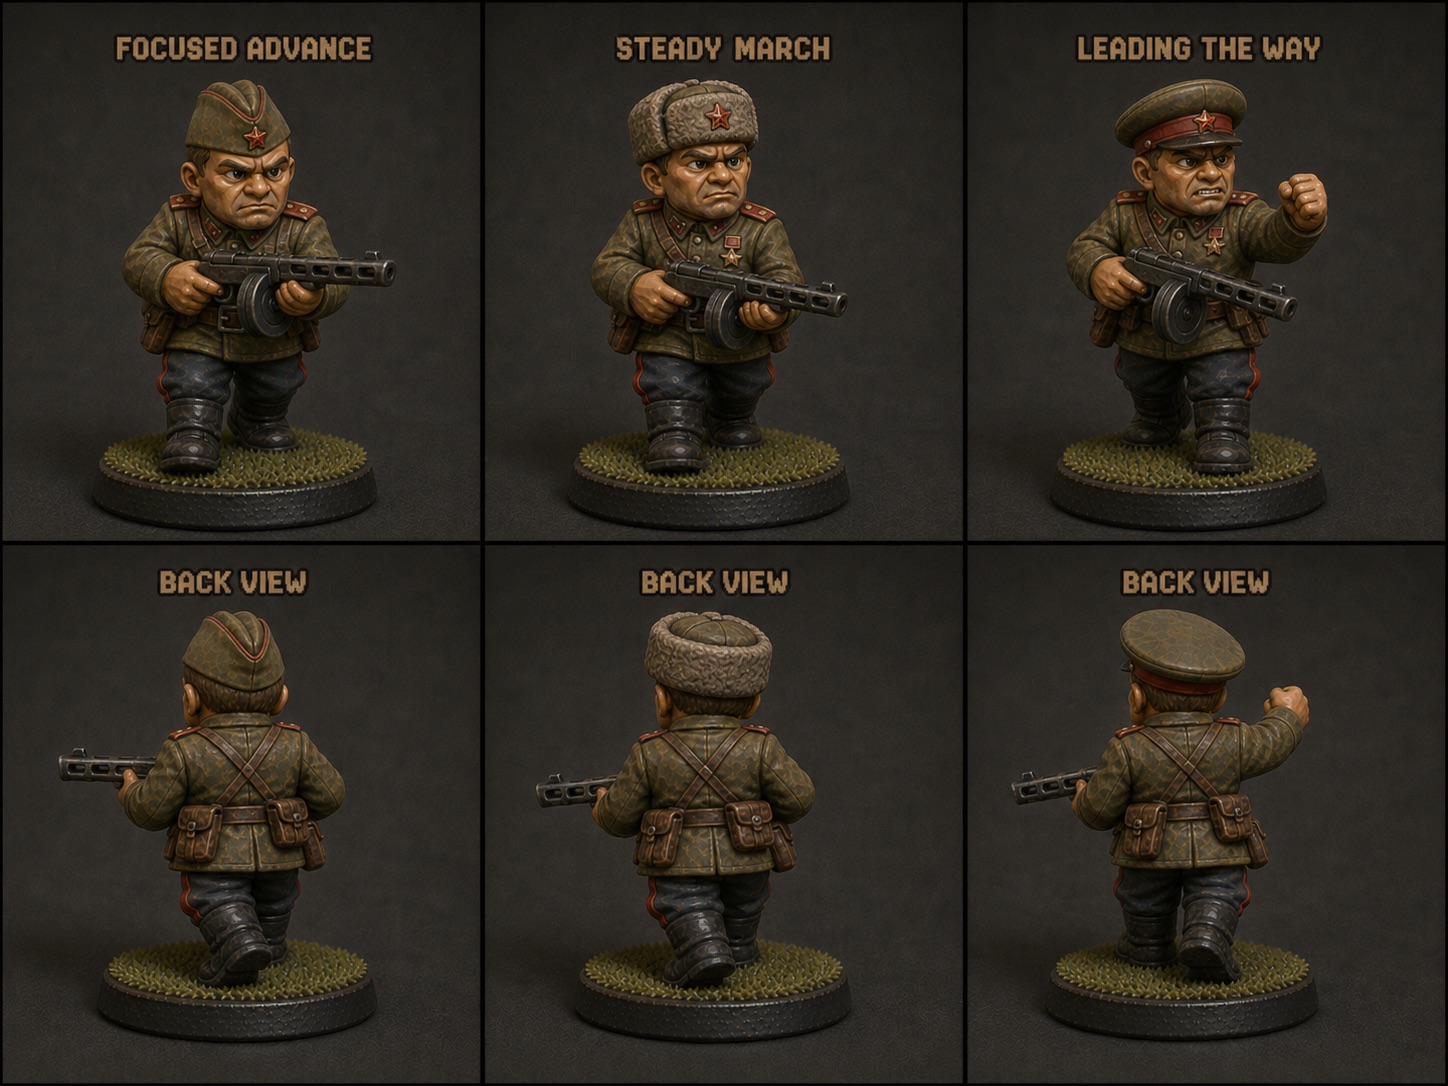
Now I drop in the seed image. The commissar. And I say: generate those poses, in this style, front and back.
That is the move. The seed image arrives after the thinking has already happened, not before. The chat is not asked to invent a style and a pose at the same time. It does the pose work first, on its own, in words. Then the style gets bolted on as a visual reference to a frame of mind that already exists.
For the Soviets I used the commissar as the seed. The kind of cartoon menace whose whole vibe is “shoot anyone who tries to run away.” That image carried the entire visual identity of the army. Every other model would be made to match it.
Here is the prompt I used, every time, varying only the unit description. I will paste it in full because the prompt itself is the artefact. I spent half a German army learning how to write it.
goal: designing soviet ww2 soldiers keeping in style with the images above from 2 perspectives (front and back)

give me 3 variations of poses

* **AT rifle team (2 models):** gunner prone firing PTRD-41 (exaggerate the absurd length of the rifle — historically over 2m, push it visually), loader kneeling alongside pointing at imagined target (the German halftrack). Mixed gritty dress, SSh-40 helmets, prominent extra ammo pouches/satchels for the big AT rounds.

Render the models in the reference style including:

* "Chibi proportions, large head roughly 1/3 body height, oversized hands and weapon"
* "Chunky oversized weapon, simplified details, no thin protrusions"
* "Integrated round base, feet merged to base"
* "Single solid silhouette, no floating straps or separated gear"
* weapons should be representative and oversized so that they survive 3d printing at small scale (2 cm)
* "Back view must be the exact same pose rotated 180 degrees"
* "Weapon position must match exactly between front and back"
* "No reinterpretation of pose"
* "Single sculpt shown from two angles, not two separate sculpts"
* "Silhouette must align when mirrored"

Suggest 3 variations for poses only
Notice what is going on here. I am not asking for a model. I am not even asking for an image. I am asking for poses, in words. The style brief is loaded into the chat’s context, but what comes back at this stage is text. Three written pose options. The image generation is the next turn, after I have read those options and decided which one I want, and after I have shown it the seed image to lock the visual style.
I am also, very explicitly, telling it that front and back are the same sculpt seen from two angles. Not two separate models. The same model, mirrored. This matters enormously when those images go into Meshy, because Meshy will happily interpret two different poses as two different sculpts and produce something that looks like the soldier sneezed mid-print.
Then the seed image goes in, the style locks, and the image generation begins. And here the “suggest three variations” framing pays off again. Not one. Three. Because once the chat is preloaded with the right context, generating variations is essentially free, and what you actually want is a buffet of options. Generate three poses. Look at them. Generate three more. Look again. Generate three more. Within ten minutes I had a wall of images for any given unit and I could just go yeah, that one, that one, not that one, that one. Pick the pose that looked most like what was in my head and move on.
Once I picked a pose, I screenshotted the front and back, dropped both into Meshy, and let it generate. With both views provided, Meshy had much less room to invent. It was joining up two views I had already approved, rather than hallucinating the missing half of the model.

After that it was mechanical. Export STL, not 3MF, because 3MF kept giving me non-manifold errors no matter what Meshy claimed about the export. Import to Bambu Studio. Scale to 2 centimetres. Simplify the mesh by 96 percent, which is an insane level of deformation that nonetheless came out at perfectly decent resolution given the size I was printing at. Slice. Print. Move on.
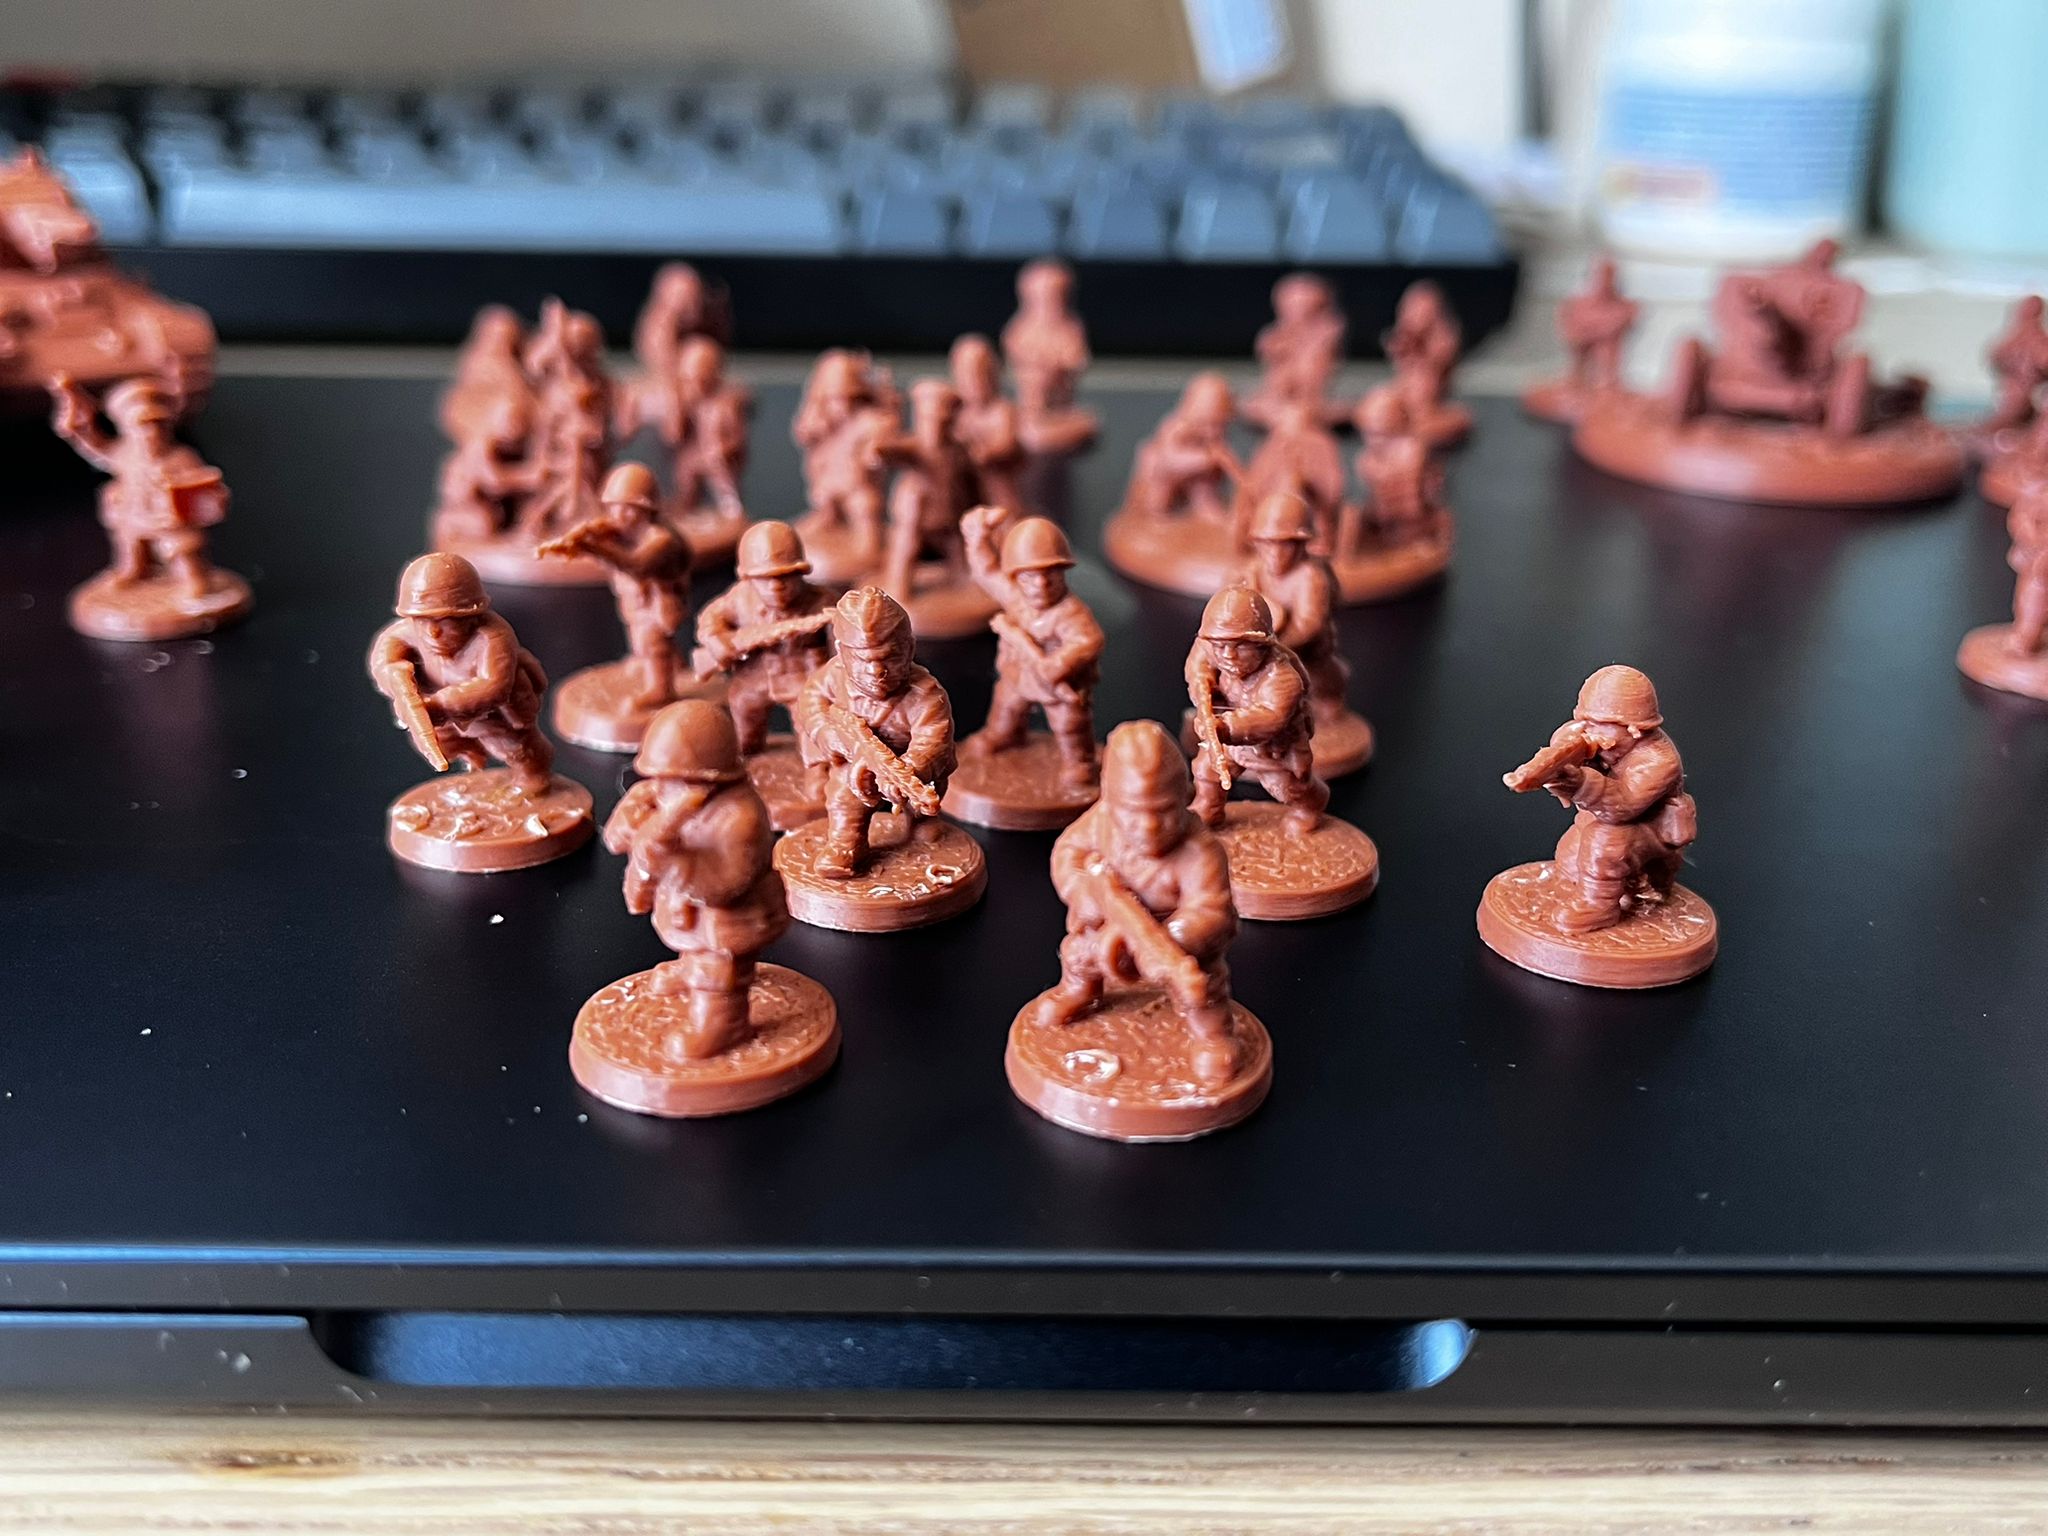
Print plates as units, not as inventory
One small thing that changed between the German and Soviet builds. With the Germans I had treated my STL library as a parts bin. When I wanted to print a unit, I would go pick the right models, drag them onto a plate, configure supports, slice. Every print was a setup task.
With the Soviets I built each plate as the unit it represented. The veteran plate is the veteran unit. The conscripts plate is the conscripts. The AT rifle team is its own plate. When I want to print a unit, I open the file and click print. No setup. No selection. No accidentally forgetting the squad leader.
This is a tiny change and it made a disproportionate difference to how often I actually printed things. Friction matters. I have written this exact lesson down about five times in the context of software and apparently I needed to learn it again with plastic.
The discipline transfers
What I just described, concept, iteration, refinement, codification into a reusable artefact, production pipeline, quality controls, delivery, is not a 3D printing process. It is a software development process. It is the same process I have been writing about for months in the context of agentic coding. Product thinking first. Iterate to find the brief. Codify the brief into something reusable. Treat each output as one of many. Build the production pipeline so the next thing is trivial.
The German army was vibe coding without discipline. Lots of energy, lots of output, no consistency, mounting technical debt with every model. The Soviet army was the same domain, the same tools, the same person, with a process in between. The result is not a small improvement. It is a different category of thing. Adding a new unique sculpt to the Soviet army from this point forward is virtually trivial. It is stupid how simple it is. It should not be this simple.
I have spent a year writing about how the harness matters more than the model, how tests and constraints are really a discipline of conscious decisions about every line, how multi-harness workflows surface regressions you would otherwise eat. I thought I was writing about software. It turns out I was writing about a way of working that translates, more or less unchanged, the moment the output head changes from “code” to “plastic.”
What broke my brain about the first printed soldier was that the loop existed at all. The thing that is breaking my brain about this post is that the discipline transfers. Whatever I figure out about working well with these tools in software is, apparently, immediately applicable to a domain I have no formal training in.
I sat down to write a blog post about printing little Soviet soldiers. I ended up writing one about how surprised I am that what I thought I knew about working with these tools in code worked, unchanged, in plastic.
I do not want to make that bigger than it is. One person, one weekend, one transfer. But it is the kind of small surprise that makes me look sideways at every other thing I think I know about my own discipline. Some of it is presumably about software. Some of it, evidently, is not.
Appendix: things that will save you time if you are doing this
A few sharp edges I hit, written down so you do not have to.
Export STL from Meshy, not 3MF. Meshy’s 3MF export gave me non-manifold errors with depressing reliability, even when the tool insisted there were none. STL behaved.
Simplify aggressively. A Meshy model can come out at over a million vertices. At 2 centimetre print scale, you genuinely do not need that. I was simplifying down by 96 percent in Bambu Studio and the prints still came out crisp.
Custom support settings for tiny prints. The defaults will fuse supports to the model and make removal a nightmare. The settings I landed on for 0.08mm layers:
| Setting | Default | What I use |
|---|---|---|
| Top Z Distance | 0.08–0.1mm | 0.16–0.20mm |
| Top Interface Layers | 2 | 3 |
| Interface Pattern | Rectilinear | Rectilinear Interlaced |
| XY Distance | 0.35mm | 0.5mm |
Increasing the Top Z Distance is the single biggest win. At fine layer heights, a one-layer gap is not enough to stop the support fusing to the print. Doubling or tripling it gives the filament enough room to drop onto the support rather than weld to it. Tree Slim or Tree Organic for style. They use less material and break away cleanly.
Generate front and back from the same prompt. Do not let Meshy interpret the back view. Do not let it interpret anything. Give it both views explicitly. Tell ChatGPT, in the prompt, that the back view is the exact same pose rotated 180 degrees. Belt and braces. You will get what you want far more often.